


A step-by-step tutorial and price range breakdown for utilizing IKEA Billy bookcases to customise his & her bed room closets, plus how they’ve held up after 4 years.

IKEA saves the day but once more for an additional sensible, cheap storage hack, solely this time in bed room closets.
We now have used IKEA furnishings for built-in bookcases, built-in cupboards, home workplace storage, and pantry storage through the years, however our DIY IKEA closet hacks formally prime all of them.
There are such a lot of wonderful DIY IKEA PAX closet system concepts on the market, however sadly the PAX system’s dimensions wouldn’t work in our tiny bed room closet area. Utilizing Billy bookcases was the proper different resolution to create our dream closet!
Replace: We constructed these closet built-ins 4 years in the past and so they’re nonetheless holding up completely! We wouldn’t change a factor about them.

Why an IKEA PAX System Would possibly Not Work For You
The extra we tried to make the PAX items match into our tiny closets, the extra we realized we’d be losing extra space than if we simply tried a unique route. So we hauled our unhappy little truck crammed with PAX unit packing containers again to the shop to alternate for this bookcase resolution as a substitute.
When you have a small closet the place you wish to create a built-in look however can’t make IKEA PAX wardrobes match, this practice closet different utilizing bookcases is a good way to create smart storage options and make the most of as a lot area as attainable.
For a number of years, we lived with these half-broken wire cabinets with barely usable items, realizing they desperately wanted a bit assist. There was no smart technique to retailer smaller objects within the prime of the unit and all completely different sizes of sneakers have been simply thrown on the ground.
This makeover tutorial is one of the best ways to realize the customized look and smart perform in your total closet for even cheaper than the PAX system!
How you can Make a Customized IKEA Closet With Billy Bookcases
Provides for a Attain-In Closet
Complete value: $324 (not together with the ability instruments we already owned)
This was the earlier than state of affairs in Robert’s closet…

Steps for a Attain-In Closet
Step 1 – Empty Closet and Patch Nail Holes
Very first thing: Take away all the previous shelving from the entire closet, patch holes with spackle, and paint the partitions.
Portray partitions isn’t completely essential, however it’s going to look so significantly better with a contemporary coat of paint. It’s going to assist eradicate any previous musty smells too.
Associated: Get the free Final Closet Clear Out Cheat Sheet
Step 2 – Assemble Bookcases
We assembled the 2 Billy bookcases following IKEA directions and positioned them aspect by aspect within the closet. The bookcases have been SO cosy that we have been simply millimeters shy of the 2 not becoming within the closet collectively. Cheers for no wasted area!

Step 3 – Add Extenders and Anchor
For the following step, we added Billy extenders on prime of the bookcases to make use of all the area as much as the ceiling peak and anchored the bookcases to the wall.
Step 4 – Connect Trim Items
To shut the small 1 inch hole between the highest of the bookcases and the ceiling, we trimmed all of it out with the 1×4 MDF strip, chopping trim boards with a round noticed and attaching it like crown molding with a brad nailer gun.

Step 5 – Caulk, Wooden Fill, and Paint
We caulked all the cracks, utilized wooden filler to nails holes (sanding clean as soon as dry), and painted over the caulk with the IKEA white paint colour as soon as the caulk was dry to make all of it appear to be one seamless built-in closet.
These ultimate touches create a clear look.
(I’ve found that Sherwin Williams’ white base paint is an ideal match to white IKEA furnishings. We obtained away with solely portray over the caulk and feathering in paint over the wooden filler. You don’t want to use paint to all the unit.)

Step 6 – Add Cabinets and Small Storage Equipment
To complete, we positioned the plastic brackets on the heights we needed for shoe cabinets. Then, we screwed in equipment just like the closet rods, IKEA Skuggis wall hooks on the closet wall, tie organizer racks, and wood Bumerang hangers.
Relying in your wants and accessible area, you possibly can add different IKEA merchandise like jewellery racks, small accent dividers, or a pull-out denim bar. When you have room on the ground, it’s a good suggestion so as to add laundry baskets too.
Aspect observe: We added baskets from the Container Retailer later to suit additional storage on the higher cabinets and within the cubbies. The tip consequence packed a lot storage perform inside this little closet!

Provides for a Small Stroll-In Closet
Complete value: $464.50
Right here is my (very) small walk-in closet earlier than. It barely even counts as a walk-in actually.

(Don’t ask why on earth I had a bouquet of flowers up on my prime shelf. I do not know.)
Steps for a Small Stroll-In Closet
Step 1 – Empty Closet and Patch Nail Holes
After doing all the prep work of wire shelf removing, spackling, and portray in my closet too, we constructed the 1 IKEA Pax unit we might match and moved it into the again recession of my closet.
(Mine is an L form nevertheless it’s extraordinarily tight and would barely be thought-about a walk-in, so the Pax body made probably the most sense in my closet’s again area of interest for hanging lengthy clothes.)

Step 2 – Assemble Bookcases to Match
We constructed the two Billy bookcases and positioned them side-by-side with a 12″ giant hole in between them.
Step 3 – Add Extenders and Anchor
Then, we added the Billy extenders on prime of the bookcases to make use of all the area to the ceiling. Subsequent, we anchored the bookcases and Pax body with the again of the items nailed into studs within the partitions.

Step 4 – Constructed Shoe Cabinets Out of Giant Gaps
To make a thin shoe shelf out of the 12″ hole between the 2 Billy bookcases, we used a number of the Billy cabinets to chop with the desk noticed and body out like its personal bookcase utilizing 2″ L brackets.
In the event you don’t personal a desk noticed, a round noticed or miter noticed will work too.

Step 5 – Connect Shoe Cabinets
We minimize extra Billy cabinets to create shoe cabinets within the skinny bookcase we produced from the 12″ hole, attaching the cabinets to the 2 Billy bookcases with the nail gun.
Step 6 – Trim Gaps
To shut the small 1 inch hole between the highest of the bookcases and the ceiling, we trimmed all of it out with the 1×4 MDF strip. And we did the identical to the Pax body on the highest and sides to make it flush with the partitions.

Step 7 – Caulk, Wooden Fill, and Paint
Then, we caulked all the cracks, stuffed nail holes with wooden filler (sanding as soon as dry), and painted over the caulk with the IKEA white paint colour as soon as the caulk was dry to make all of it appear to be one seamless built-in closet.

Step 8 – Add Small Storage Equipment
The remainder was simply screwing in equipment just like the closet rods, Komplement drawers/cabinets, Skuggis wall hooks, and wood Bumerang hangers.
We later added two several types of baskets as that was our resolution for not having any drawers in order that we will retailer out-of-season garments and equipment in them.
Honestly, we don’t miss having drawers in any respect, and I do nonetheless have a few drawers in my closet with the one Pax body we have been ready to make use of.

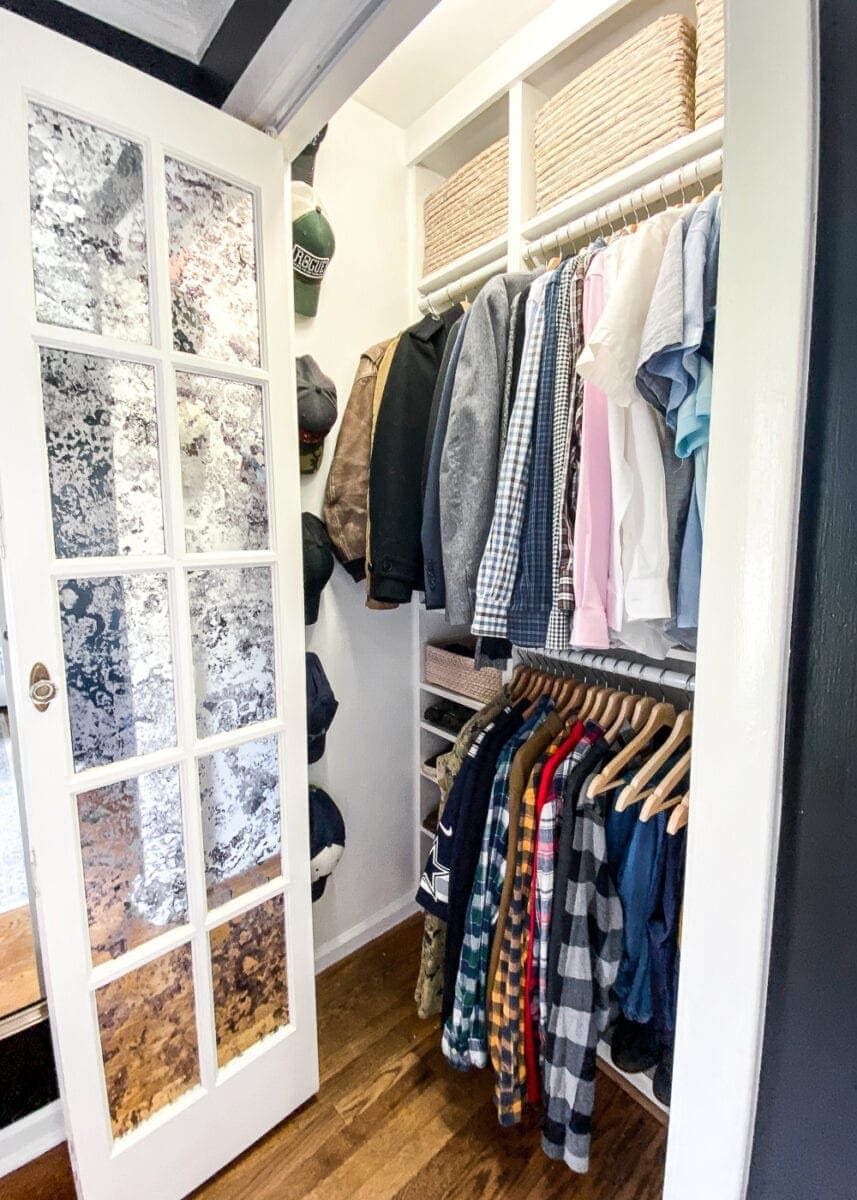
Completed IKEA Billy Bookcase Closet
I’m SO excited to see how this has all come collectively and this Plan B with the Billy bookcases has labored out completely to assist us maximize much more area than what we had initially deliberate and with what we had earlier than utilizing the wire cabinets.
This DIY was so easy. The toughest half was truly sorting via my mountain of garments to position all of them properly within the completed closet.
Aspect observe: How cute are these DIY mirrored French bifold closet doorways we personalized?

Bed room Closet Organizing Suggestions
When you’re completed constructing your closet, listed below are some smart organizing tricks to take your bed room closet to the following degree.
- Preserve clothes colour coded by sorting items in rainbow order
- Group clothes by sort and season
- Flip round hangers as you fill the closet. Flip the hanger the fitting means when you put on an merchandise. On the finish of a yr, donate what hasn’t been worn.
- Retailer most used objects at eye degree.
- Use matching hangers.
- Make the most of shelf dividers.
- Use multi hangers to make the most of vertical area.
- Add lighting. (We love these wi-fi movement sensor LED lights.)

You’ll be able to see the ultimate walk-through of the stuffed IKEA closet system right here, plus ideas for organizing your wardrobe.
Observe this step-by-step to construct a DIY IKEA closet system with Billy bookcases.
- Empty Closet and Patch Nail Holes
Very first thing: Take away all the previous shelving from the entire closet, patch holes with spackle, and paint the partitions.
Portray partitions isn’t completely essential, however it’s going to look so significantly better with a contemporary coat of paint. It’s going to assist eradicate any previous musty smells too. - Assemble Bookcases
We assembled the 2 Billy bookcases following IKEA directions and positioned them aspect by aspect within the closet. The bookcases have been SO cosy that we have been simply millimeters shy of the 2 not becoming within the closet collectively. Cheers for no wasted area!
- Add Extenders and Anchor
For the following step, we added Billy extenders on prime of the bookcases to make use of all the area as much as the ceiling peak and anchored the bookcases to the wall.
- Connect Trim Items
To shut the small 1 inch hole between the highest of the bookcases and the ceiling, we trimmed all of it out with the 1×4 MDF strip, chopping trim boards with a round noticed and attaching it like crown molding with a brad nailer gun.
- Caulk, Wooden Fill, and Paint
We caulked all the cracks, utilized wooden filler to nails holes (sanding clean as soon as dry), and painted over the caulk with the IKEA white paint colour as soon as the caulk was dry to make all of it appear to be one seamless built-in closet.
- Add Cabinets and Small Storage Equipment
To complete, we positioned the plastic brackets on the heights we needed for shoe cabinets. Then, we screwed in equipment just like the closet rods, IKEA Skuggis wall hooks on the closet wall, tie organizer racks, and wood Bumerang hangers. Relying in your wants and accessible area, you possibly can add different IKEA merchandise like jewellery racks, small accent dividers, or a pull-out denim bar.


