


This publish is sponsored by Sunbelt Leases.
Tips on how to change iron balusters and newel publish for a DIY staircase makeover on a decent price range through the use of device leases to scale back undertaking prices.
Add this DIY undertaking to the record of ones the place we are saying, “Why didn’t we do that sooner?!”

Whereas there was actually nothing incorrect with our stair railing earlier than, it simply wasn’t our model. I’m positive somebody sooner or later in our home’s historical past actually loved it.

Is It Simple to Substitute Staircase Spindles?
The excellent news is you possibly can change simply the spindles fairly than change your complete banister as a reasonable technique to get an up to date look, and most staircase programs might be altered as an intermediate DIY undertaking.
I virtually felt responsible for wanting to vary the stair balusters in our lobby as a result of I do know so many individuals love that twisty basket wrought iron look. However they have been simply too intricate for my style, and I needed to vary the the chipping, reddish gel stained wooden handrail to a impartial shade anyway to enhance our mid-tone hardwood flooring.
After I talked about it to Robert, he mentioned, “I’m so glad you wish to change that! I don’t prefer it both, however I didn’t wish to say something in case you favored it.” (Bless. I feel I’ll preserve this man.) So a undertaking was born.
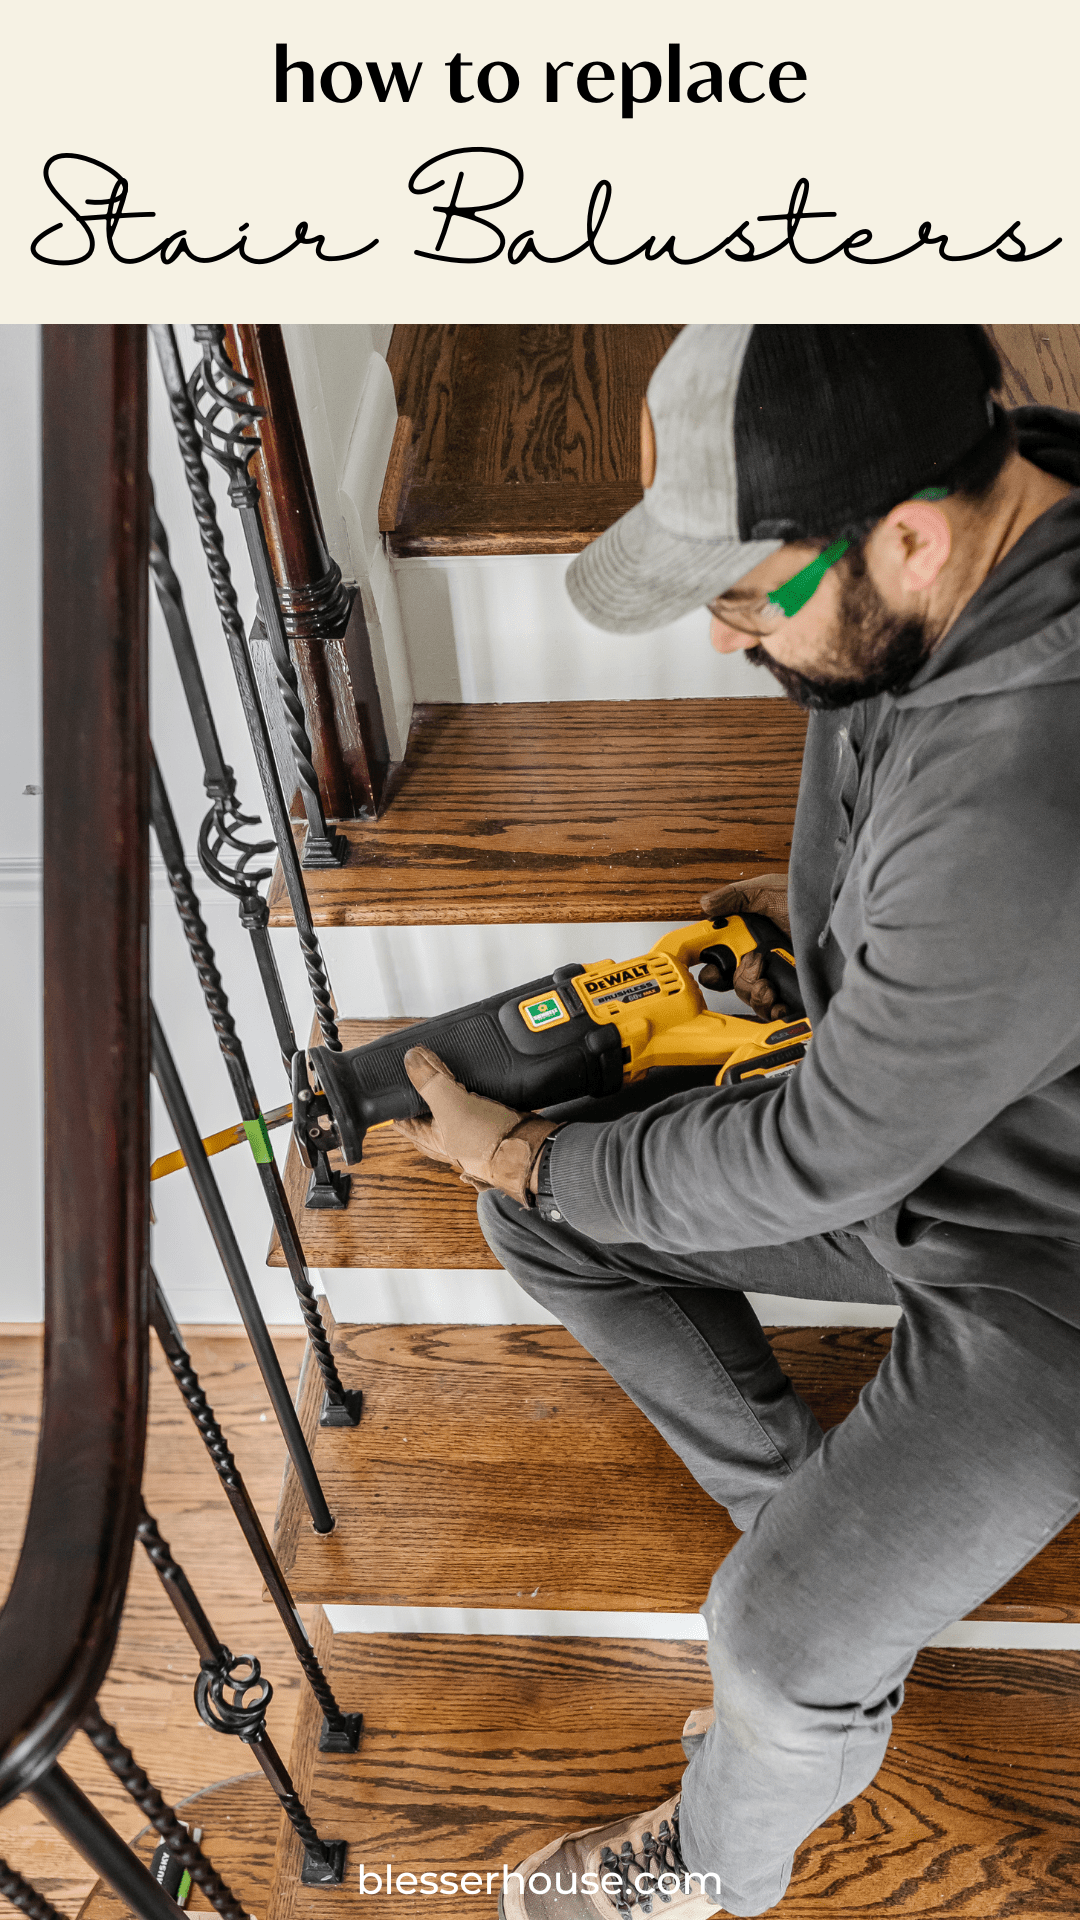
We wanted a excessive efficiency reciprocating noticed to deal with the large job of slicing by our outdated wrought iron balusters, so we rented one from Sunbelt Leases to fill the hole in our device arsenal.

If in case you have the appropriate instruments, changing stair spindles (or balusters because the technical time period) is a good undertaking to do your self and might save as much as 1000’s of {dollars} as an alternative of hiring out. Eradicating iron balusters simply requires extra energy and persistence than wooden.
Particularly in a DIY undertaking you’ll seemingly solely do as soon as, it’s less expensive to hire the specialty device you want from the 1000’s Sunbelt Leases has accessible.
It wasn’t straightforward to seek out a lot info on-line about change iron balusters (solely tutorials on change wood ones), however the rental tools specialists have been capable of information us to the right methodology for the job.

We selected to switch our current iron stair balusters with a unique model of iron balusters, however you could possibly additionally use this methodology to switch any sort of current balusters you have got with wooden balusters, in case you choose a extra conventional model.
There are such a lot of staircase railing kinds on the market, and you’ll combine and match handrails, newel posts, and balusters to customise the look you need.
The excellent news is when you have wooden balusters or plan to switch steel balusters with wooden balusters, wooden is way simpler to work with than steel as a result of it’s simpler to chop and simpler to restore in case of a mishap.

Changing Balusters for a Easy DIY Stair Makeover
Instruments
- Reciprocating noticed (A excessive powered one like a 60 Volt cordless reciprocating noticed works greatest on iron balusters.)
- A number of reciprocating noticed blades (Cuts are best to make with a recent blade, so change your noticed blade after each 3-4 balusters. You should definitely get a steel slicing blade for iron balusters and a wooden slicing blade for wood balusters.)
- Store Vacuum
- Drill
- Drill paddle bit (The scale you want will depend upon the diameter of your newel publish, in case you’re changing that too.)
- Forstner bit (The scale you want will depend upon the diameter of your balusters.)
- Phillips bit
- Pliers
- Hack noticed or miter noticed
Provides
- Stair balusters (We used these 5/8 in plain spherical powder coated steel balusters)
- Stair sneakers (Use stair sneakers that match your balusters’ diameter and magnificence, and verify your staircase design to resolve in case you want angled or flat sneakers. If the balusters connect to a step at a 90 diploma angle, you want flat sneakers. If the balusters connect at an angle to a stringer, a board that runs at an angle alongside the steps, you want angled sneakers.)
- Newel publish (Optionally available: Our outdated newel publish matched the twisted wrought iron model of our outdated balusters, so we needed to change it. We used this plain spherical iron newel publish.)
- 4×4 wooden block (Optionally available: to make use of as a newel publish base)
- Pace sq.
- 4 2-in self-drilling wooden screws
- 3/4-in self-drilling wooden screws
- Wooden filler
- Correct security gear – work gloves, security glasses, closed toe sneakers
- Heavy obligation building adhesive
- Painters tape and pencil
- Bonding primer
- Waterborne alkyd paint in satin
- Professional high quality 2-in angled paint brush
- Advantageous grit sandpaper
- Tack fabric
*It helps to have a accomplice enable you with this undertaking.

Step 1 – Take away Outdated Balusters
We have been actually actually intimidated to begin eradicating the outdated balusters at first, however usually the key about DIY initiatives is dealing with your concern.
Balusters are normally hooked up to a handrail and treads or a stringer with adhesive, epoxy, and/or screws. So examine your outdated balusters to see how they’re hooked up. Take away any screws or nails first with the drill or pliers. Ours have been merely glued in.
Place a chunk of painters tape round every baluster. Quantity every one so as. It will give your noticed blade some grip because it makes its preliminary minimize whereas additionally permitting you to save lots of your balusters to make use of as a measuring information for slicing new balusters later.
Beginning on the painters tape, use a reciprocating noticed (with a steel slicing blade for iron | wooden slicing blade for wooden) to chop the baluster within the center.

Have your accomplice maintain the highest of the baluster to scale back strain on the handrail and stop the wooden from cracking.
WARNING: You should definitely minimize away from the course of your accomplice and have your accomplice stand nicely behind the noticed to forestall any contact with the blade.
As soon as minimize, every finish of our balusters got here out of the handrail and treads pretty simply with a delicate wiggling movement. For any cussed ones, use pliers to interrupt away the outdated adhesive.
Substitute your noticed blade after slicing each 2-3 balusters. Boring blades create extra friction placing extra strain on the handrail and rising the prospect of injury.
Use the store vacuum usually to wash up any tiny steel shards leftover from slicing.

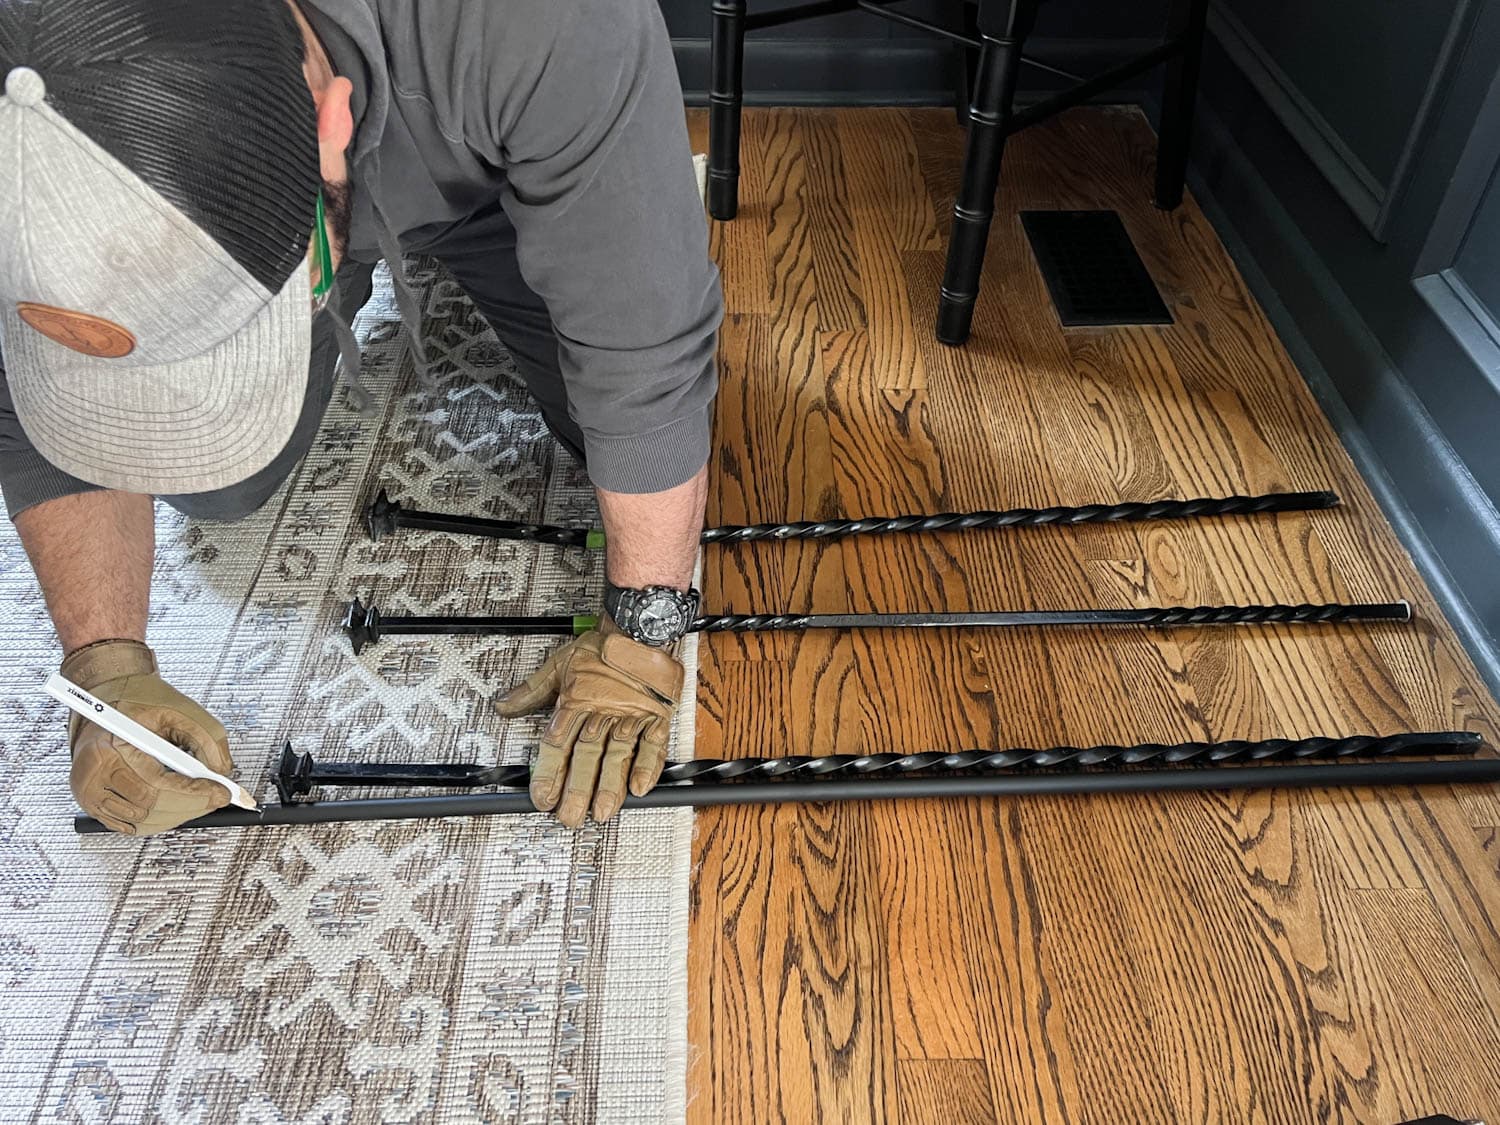
As soon as minimize and eliminated, put aside the outdated balusters and line them up so as in an effort to use them as a reference for slicing your new balusters (that is the place the numbered painters tape turns out to be useful).
Tip: For those who additionally plan to switch your newel publish, solely take away one or two balusters after which skip right down to Step 4! That is vital to take care of your handrail’s assist.
Step 2 – Clear Up Outdated Holes and Resize With the Drill
To maintain issues as straightforward as potential, it’s a good suggestion to reuse the identical spacing and outdated holes leftover within the treads and handrail from the eliminated balusters with new balusters across the similar dimension.
Take away any outdated adhesive or epoxy from the outdated holes utilizing a forstner drill bit the identical dimension because the holes. A forstner bit is much less prone to trigger wooden splinters within the hardwood treads and handrail to make a clear, clean gap. If in case you have it in your toolbox, it’s a a lot better selection than a paddle bit for this step.
Verify to verify the holes are massive sufficient to suit your new balusters; drill your holes bigger to suit as wanted. If the holes are larger than the balusters, the sneakers can be utilized to hide these later.
Step 3 – Reduce New Balusters
Use your outdated balusters that you simply numbered and put aside in Step 1 as a reference to mark the measurements to your new balusters with a pencil.
In case your outdated balusters will not be usable, measure the area between the highest of the tread and the underside of the handrail and add an inch.

Use a miter noticed or only a easy hack noticed to chop by the brand new iron spindles. (If utilizing wood spindles, a daily hand noticed will do.) We positioned a few towels beneath the iron spindles so the black end wouldn’t get scuffed on our sawhorses.

Dry match the brand new spindles to verify all of them match on the stair railing, however take away them and set them apart for later. It’s simpler to color the handrail subsequent with none spindles in the best way.

Step 4 – Connect a New Newel Publish
This step received’t apply to each baluster alternative undertaking, however as a result of our stair railing’s newel publish matched our outdated spindles with its ornate iron basket design, we needed to change the newel publish as nicely.
Our handrail’s design curls across the newel publish, so we needed to take away two spindles to get them out of the best way in order that we may entry the newel publish. Leaving many of the spindles intact for this step supplied sufficient assist underneath the handrail to permit us to switch the newel publish.
Reduce and take away the newel publish the identical approach because the balusters. Our outdated publish was mounted on a wood block screwed into the tread. After eradicating the iron publish, we minimize away the wood cap and eliminated the screws from the block to disclose the publish gap.
On a brand new 4×4 wood block, we used a pace sq. to mark an X and discover the middle of the block. Putting the brand new newel publish within the middle of the X, we traced it as a information to drill a gap.
We used a paddle bit to drill the newel publish gap. Utilizing a daily drill bit, we drilled 4 pilot holes midway by the block.

As soon as drilled, we set the brand new newel publish into the block on the tread and into the handrail. To anchor the block to the tread, we drove 4 2-inch wooden screws by the pilot holes.
Then, we simply crammed the screw holes with wooden filler and utilized building adhesive into the newel publish holes within the block and handrail.
(We waited to connect the final two spindles across the newel publish till we may utterly sand, prime, and paint the block in order that we didn’t should work round any obstacles.)

Step 5 – Prime and Paint
It’s lots quicker and simpler to prime and paint the handrail earlier than changing balusters. Calmly sand the floor to present it “tooth” and wipe away any mud with a tack fabric.

Use a professional high quality angled 2-inch paint brush to use a coat of waterborne bonding primer.

As soon as the primer is dry, sand it clean with a superb grit to remove brush strokes. I like to make use of simply easy sandpaper (not a sanding block) in order that I can simply contour it into the curves and grooves of the handrail.
Use a tack fabric to take away sanding mud.

Then, apply two coats of a waterborne alkyd paint. (We used satin sheen – despite the fact that that photograph above depicts semi-gloss as a result of I made a decision final minute that satin labored higher with the end of our new balusters.)
Waterborne alkyd paint is greatest for stair railings as a result of it cures to a sturdy, laborious floor that may face up to steady site visitors. It’s self-leveling so brushstrokes disappear because it dries to a clean end.

Step 6 – Connect New Balusters
After the paint is dry on the handrail (in a single day is greatest), start putting in the brand new balusters. Slide a shoe onto a baluster and apply a some building adhesive into the handrail gap and tread gap.
Insert the top of the baluster into the handrail gap. There must be sufficient further room within the handrail gap to push the baluster barely upward in order that the underside finish slides into place within the tread gap.

Apply somewhat extra building adhesive into the handrail gap after the baluster is in place for further safety. We used some painters tape to guard the black steel spindles from any adhesive messes and eliminated the tape proper after utility.
To safe the balusters to the treads, we set 3/4-inch self-drilling wooden screws beside the iron spindles in order that they have been cosy within the holes.
Then, we slid the sneakers down over the tread holes for a clear look.
We let the development adhesive utterly dry for a minimum of 24 hours earlier than touching up with paint.

DIY Stair Makeover After
Take a look at that modern new black stair railing! Effectively, it’s half new anyway.
Our stairs are actually the proper mix of contemporary and conventional, which you realize, in case you’ve hung round right here for some time, is precisely how we prefer it.
I do suppose someday later this yr I’d like so as to add a runner to the steps. These naked wood stair treads are somewhat slippery and loud with out one. Plus, it might be so fairly! I’ve toyed with the thought of portray the stair risers a unique shade too. What do you suppose?
Runner or not, I can’t recover from the distinction 6 years have made in our lobby and staircase.
By no means underestimate the ability of paint and good quaint will energy.
To not point out, that Fb Market console and our household gallery wall labored some magic too.

How a lot does it price to switch stair spindles?
This undertaking was a lot extra budget-friendly than hiring a contractor and completely DIY-able.
As a result of we didn’t have to purchase the next powered noticed to deal with the wrought iron removing and will hire the required device from Sunbelt Leases as an alternative, we managed to do that undertaking for even much less.
The entire price of the device rental, noticed blades, primer, paint, adhesives, new balusters, newel publish, and disposable supplies was $383 whole.
In fact the longer your stair railing, the costlier it is going to be. For those who have been to switch the handrail as nicely, that may improve the fee.


In order that’s it. The just about official earlier than and after, with possibly solely needing the addition of a stair runner… or somewhat ceiling remedy… possibly an actual wool classic rug ultimately.
Okay, you realize what? There’s by no means truly an official “after” as a result of the journey is the perfect half. 😉
However that stair railing? It truly is the after I’ve dreamed of for six years.


