Manufacturing facility-made bathe pans can be found available on the market, however you may make your individual based on your wants by customizing their form and dimension. You’ll be taught right here the best way to construct a bathe pan.
Create waterproof, and customized bathe pans for a curved bathe attachment. You need to concentrate on the appears to be like, the way it feels underfoot, and its operate.
You’ll be able to assemble good bathe flooring with a mortar base, which is waterproof and appears elegant. Body the bathe partitions and subfloor with drain plumbing earlier than beginning this venture.
Fundamentals of Bathe Pans
The bathe basins are referred to as pans or flooring of a bathe. Putting in a pre-fabricated polyurethane or fiberglass pan is essentially the most well-known method. The pre-fabricated polyurethane technique is the normal technique of making a bathe pan, wherein most creativity is allowed with tile on a mortar base.
It’s a comfy approach for DIYers. Many layers are made to realize a slope to the drain, and the close by supplies are saved waterproof.
Pre-slope and Paper of Tar
The pre-slope bathe pan is constituted of a mortar base. Extra sophistication is achieved by giving this slop one other mattress of mortar. Put down pre-slop on tar paper.
Water resistant Bathe Pan Liner
There’s a waterproof layer on the highest of the pre-slope fabricated from PVC or some polymer materials. This waterproof liner protects the subfloor from moisture.
Prime Slope
There may be one other mortar layer above the waterproof layer with the identical outlines because the pre-slope.
Tile
The tile is the highest layer of the bathe pan ground. A skinny mattress of mortar is made to set the tile in it, and the seams of the tile are full of grout later.
Tile Curb Bathe
The bathe partitions certain the bathe pan on three sides. The open space the place you enter the bathe is called the curb. It’s between 2-inches and 3-inches above the bathe drain stage.
Instruments and Supplies Required
- Round noticed
- Tile
- Nails
- Mortar
- Tar paper
- Chalk
- Measuring tape
- Hammer
- Knife
- Duct tape
- Mixing tray for mortar
- Water
- Backyard hoe
- Flat trowel
- Stage
- Bathe liner
- Silicone Sealant
- Material
- Dry mop
- Tile thinset
- Tile spacers
- Giant bucket
Learn how to Set up Bathe Pan?
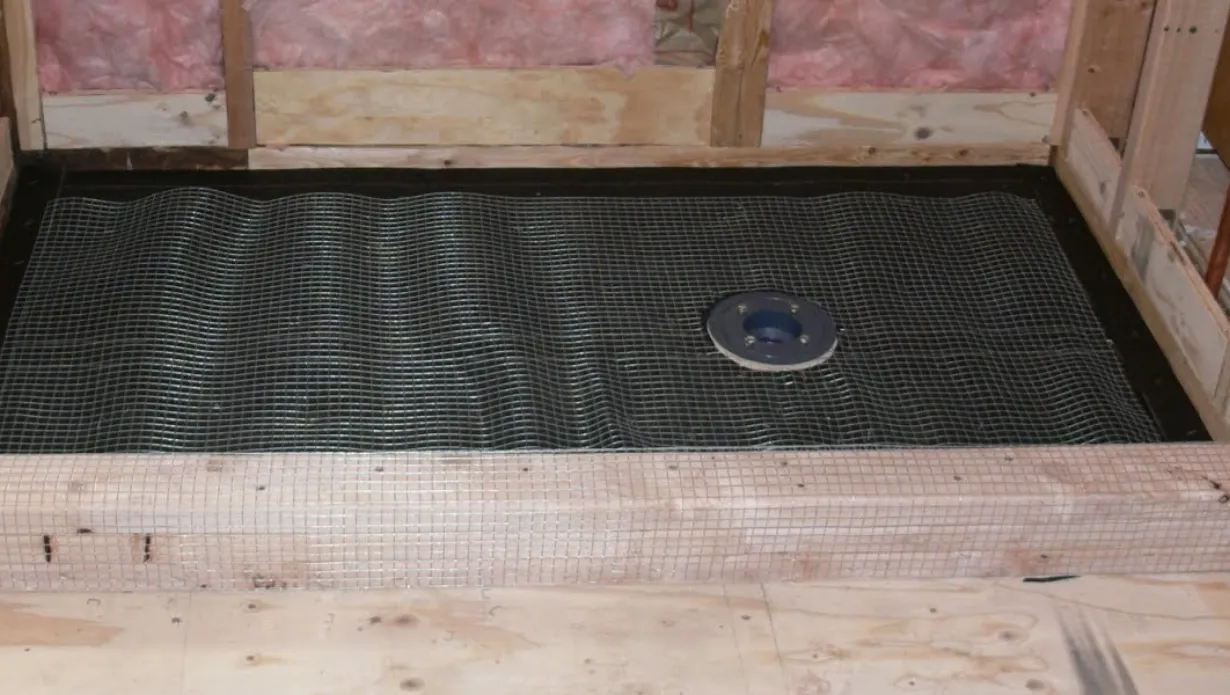
Bathe Pan Framing
- Use a measuring tape to measure the area between the wall studs the place you wish to construct the bathe pan and observe it. Minimize 2 x 6 inches boards through the use of a round noticed.
- You’ll be able to reduce the boards on the time of buy in the event you do not need a round noticed.
- Measure the size of the perimeters of the bathe pan and go away area for the curb, which is the entry level of the bathe pan.
- Lay down the reduce board and use a hammer to nail them into the subfloor. Nail two extra boards on the floor of the primary one. Don’t use picket boards if in case you have a concrete bathe ground.
- For the safety of the subfloor from water, use tar paper. Place tar paper sheet on the bathe ground pan and make it flat utterly. Nail the ground 8-12 inches aside to maintain the tar paper in place.
- In case of utilizing a number of tar paper items, they need to overlap one another by 2 inches.
- Discover the drain extension on the tar paper and reduce it by following the perimeters of the drain. Use a utility knife to chop it. Minimize the tar paper as near the sting as attainable as a result of eradicating an excessive amount of tar paper will moisten the subfloor.
- Make a ground drain within the space by hiring a plumber if there isn’t any ground drain. Purchase a 2-part drain that has higher and decrease extensions.
- Shut the opening of the drain with duct tape. Place the tape by overlapping it by 1 inch to cowl utterly. Now you’ll be able to apply mortar to the bathe pan. As an alternative of tape, a material can cease mortar from getting into the drain.
Apply Mortar Base
- Take a mortar mixing tray and pour a bag of mortar into it. Sprinkle somewhat water and blend it with a backyard hoe. Make a combination with 1 half water and 4 elements mortar to get the suitable uniformity. Combine the mortar to get the form of a ball.
- Too runny mortar is not going to be simple to use. The dimensions of the bathe pan tells how a lot mortar is required. Two luggage are required for a 4 x 4 ft. bathe pan.
- Apply the mortar to the tar paper and unfold it evenly. Form and push the mortar into the bathe border with a flat trowel. Make a 1 1/2 inches thick border, and its size ought to be three to 4 inches from the body.
- Use a trowel to press the mortar and take away air bubbles.
- When you’ve got made the bathe border, make the floor flat in direction of the underside of the drain. Begin this course of from the curb and work in direction of the drain. The slope of the mortar ought to be ¼ inch per 1 foot.
- The slop of the mortar’s first layer ought to be appropriate irrespective of if the smoothness will not be good. You need to use a stage to verify the ground doesn’t have bumps.
- After making its floor clean, let it sit in a single day. You can begin your work on it after 24 hours. After drying the mortar, peel off the duct tape.
Make Bathe Pan Water-Resistant
- To guard the subfloor from getting moist, use a bathe liner. It’s a barrier of safety for the subfloor. Measure the bathe pan dimension. Add additional 8 inches to the measure for the framing on its sides.
- Use a knife to chop the liner based on the bathe pan.
- A silicon gun is the easiest way to use silicone sealant. Apply it across the fringe of the drain, however the silicon bead have to be skinny. Silicon retains the liner agency and stops water from damaging the subfloor.
- Place the bathe pan liner down on the mortar floor and make it flat as a lot as attainable. Tightly press the liner over the mortar edges and onto the silicone to firmly stick it.
- Nail the sting of the liner positioned to the wall studs as a result of there’s a excessive probability of leaking.
- Discover the drain above the liner and reduce it with a utility knife in an X-shape. On this reduce of the liner, fold it into the drain. This can hold the circulation of water into the pipes.
- One a part of the drain has an higher flange that makes use of bolts to connect with the underside. Flip the highest flange from left to proper into the drain. It have to be one to 2 inches above the underside flange.
- The bolts on the underside flange have to be tightened to guard it.
- Combine extra mortar for one more layer above the bathe liner. Go away it to dry. Now apply a thick border of 1 and half-thickness and make it flat in direction of the drain. Use the identical method to get a clean floor.
Tile Bathe Ground
- Place the tile close to the drain and mark it with a pencil. Proceed inserting them to verify what number of tiles will likely be required.
- Choose the tile colour that appears good with the opposite tools within the space.
- Take away the mud and particles from the mortar with a moist material to get a clear floor as a result of a grimy floor is not going to enable the tiles to stick to the bathe pan. Dry it with a mop.
- Tile is not going to persist with the moist floor of the mortar, so it’s essential to dry it.
- Apply thin-set on the bathe pan solely to make use of one or two tiles. You’ll be able to unfold it with a trowel. Its layer ought to be 1/8 inch on the mortar.
- Firmly press the tiles into the thin-set to stay to the floor. After one or two minutes, wipe it off. If you’d like a uniform look of tile, use tile spacers.
- Take a big bucket and blend grout in it. Put a small quantity of grout onto the bathe ground tiles and unfold it over them utilizing a trowel. Make a clean floor by pushing it into the empty areas. Go away it for one hour to dry.
FAQs – Often Requested Questions
Is it Doable to Construct Your Bathe Ground Pan?
You can also make your bathe ground pan by following simple methods as a substitute of hiring an expert. A DIY route will prevent cash.
What Supplies are Required to Construct a Bathe Pan?
Completely different supplies are required to construct a bathe pan, similar to mortar, tar paper, bathe liner, silicon, thin-set, and grout.
What’s the Process to Make a Bathe Ground Pan?
Step one is the framing of the bathe pan. When it’s performed, apply a mortar base. Put bathe liner to make the floor waterproof. The final step is tiling the ground.
What Thickness is Finest for a Bathe Pan?
If you wish to set up tile, the thickness of the bottom ought to be 2 – 3 inches.
Ultimate Ideas
A bathe pan is broader and straightforward to sit down on if we examine it with the bath. The doorway to the bathe is straightforward. If you happen to set up the suitable bathe pan, your total lavatory is not going to get water spillage.
Comply with the steps given on this information and learn to construct a bathe pan. I hope these steps will likely be useful for you.